
How to auto-sync trades from TradingView to TradesViz trading journal?
Quick Start
To auto-sync your TradingView account, visit https://tradesviz.com/import/.
Use the first dropdown to choose your trading account, the second dropdown to choose TradingView,
then switch to the Auto-Sync tab and follow the steps below.
You can also open Import/Export from your profile menu in the top-right corner.
Auto-Sync Setup Instructions
You can now sync trades to your TradeasViz account from one of the most used charting and execution platforms - TradingView.
This is completely different from our existing API-based syncs we have had so far for brokers like IBKR, TradeStation, Tradovate, etc.,
This time, you are going to need an extension to help with the data extraction and sending process.
Here is the Google Chrome extension page: https://chrome.google.com/webstore/detail/tradesviz-sync-trades/hlolebjhificekbmniegjfcpoondhlho
Here is the Firefox extension page: https://addons.mozilla.org/en-US/firefox/addon/tradesviz-sync-tradingview/
Note: This extension uses web scraping to get the executions alone to send to your TradesViz account directly. If you do not agree to this, please do not use this extension or this way of auto-import. This is also not endorsed or affiliated with TradingView in any way. It is purely an initiative by TradesViz to help traders sync their trades TradesViz journals in a more seamless way.
Please note: You need to open a TradesViz tab and a TradingView tab on your browser (Chrome or Firefox) and then follow the steps below.
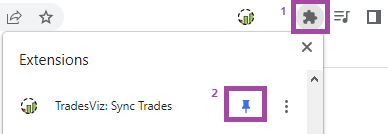
If you are on Chrome, make sure the TradesViz icon appears in the top right corner (at the right end of the URL bar), and make sure to click on the puzzle icon and then click on the pin icon next to TradesViz extension entry:
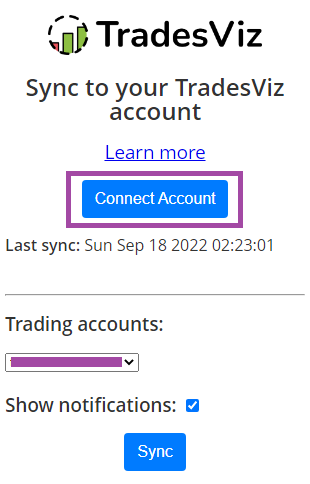
Once you install the extension, make sure you are logged into your TradesViz account and click on the extension icon (TradesViz icon) in your browser (usually in the top right corner). Now click "Connect account" in the extension popup. This should update the trading account list and also the last update time on the extension display.
After this is done, head over to any of the symbols you have traded on TradingView, navigate to the paper or real trading tab and click on the History tab. Here is an example of paper trading:
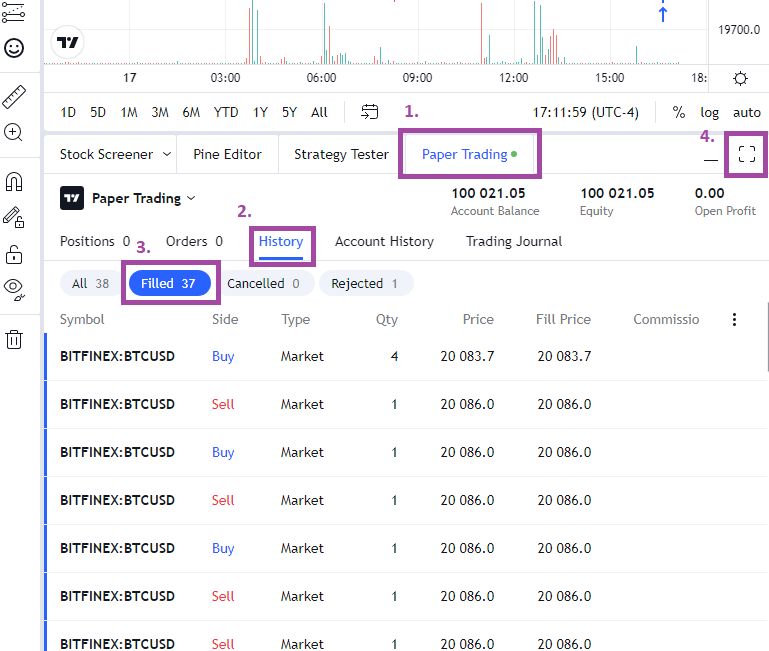
Once you are on this tab, click on the "Fills" tab and then expand the orders window. Finally, open the TradesViz extension select the trading account into which you want the trades to be put and then click "Sync".
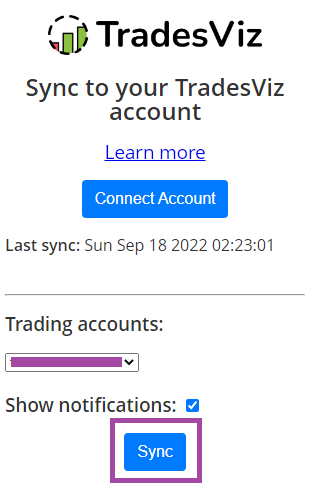
You should see a notification from the extension saying the sync is complete or in process. Check your TradesViz account and you should be able to see the trades.
You can repeat this step until all your trades are synced as you scroll down on the orders list. If you have many pages of trades, scroll down on the filled orders page and click "Sync" again (de-duplicates are handled automatically). You can repeat the last 2 steps till all your trades are synced.
Few things to note:
- If you have a free account, only stocks will be synced - you will still see the "sync successful message"
- If you have any cookie blocker, this extension will not work because it depends on the session data of your logged-in TradesViz account
- If you have successfully connected your account but sync is not working/you are seeing any errors, please share the History tab's export to support@tradesviz.com along with the screenshot of the history tab.
- To export history:
- Click on the 3 dots icon on the rightmost corner of the table and make sure all columns are checked and are visible in the table.
- Now click on the dropdown that has the TradingView logo (or relevant platform's logo through which you are trading)
- Now select "Export data"
- If the extension is not visible in the Chrome URL bar, click on the extensions/puzzle icon and click the pin icon next to the TradesViz extension
- If you are not able to see notifications on Chrome, please make sure to enable Chrome notifications in your OS settings and make sure your notifications are NOT silenced (priority/do not disturb mode should be DISABLED):
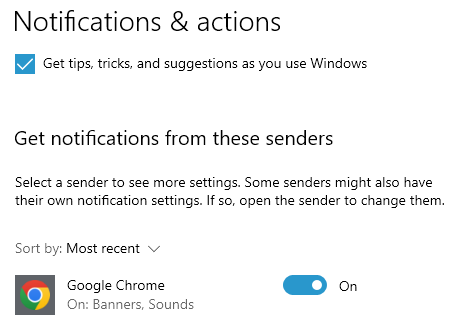
We hope this makes journaling for all TradingView users very easy and seamless! Note that you can combine this with real-time notes to create a truly automated journaling experience.
Let us know if you have any questions or feature requests by emailing us at support@tradesviz.com
Important Notes About Auto-Sync
- Auto-sync only brings in recent / new trades going forward. For older history, first do a one-time
manual file import from the Upload File tab, then enable auto-sync.
- TradesViz uses read-only access wherever the broker supports it. We never request trading,
transfer, or withdrawal permissions.
- Some brokers (OAuth-based) expire connections periodically and require you to reconnect.
Troubleshooting
- If the connection fails, double-check API keys / OAuth login and that required permissions are granted.
- Make sure the trading account in TradesViz matches the asset class (stocks vs. futures vs. crypto).
- If sync stops bringing in new trades, reconnect the broker from the Auto-Sync connections page.
Need Help?
Email support@tradesviz.com with your broker, the trading account name in
TradesViz, and a screenshot of the error.
If your broker is not yet supported for auto-sync, see our
supported brokers list or contact support to request it.
FAQ
Why are old trades missing after I connected auto-sync?
Auto-sync only fetches recent history. Import a historical CSV/Excel file first from the Upload File
tab, then enable auto-sync for new trades going forward.
How often does auto-sync run?
Connections are synced automatically on a recurring schedule (typically daily). You can also trigger a
manual sync from the Auto-Sync connections page.
Is auto-sync safe? Can TradesViz trade on my account?
No. TradesViz requests read-only access whenever the broker supports it. We do not place trades or move
funds. For OAuth-based brokers, the consent screen will show exactly which scopes are granted.
Full blog post
You can also read the original walkthrough on our blog: TradingView auto-sync guide.
Updated on: 17/07/2026
Thank you!